![]()
Exercise 3
Archaeology Lab ANTL 207
Lithics Exercise 3a – Lithic Projectile Point Description
26 & 28 January, 2010
Exercise 3a
In this exercise you will be describing four projectile points in detail the way you might for an archaeological report. You will attempt to match each point to known point types, drawing an outline sketch, recording its metric attributes and describing its unique attributes. Look at the lithic type collection in the books and poster in the Lithics Laboratory for possible matches.
Use four separate blank pieces of paper – one for each projectile point. Use the categories below (material, function, shape, etc.) to describe each of your projectile points. The exact format is up to you – just be sure to address each of the questions within each descriptive category below. It is very important that you take your time and look very carefully at each artifact. You have 2 ½ hours to complete this exercise.
Material: You probably do not know the kind of stone from which your point is made, but try to determine it if you can. Describe the color, texture and any variation (i.e., striping, inclusions, etc.) in the main body of the stone. Is there any evidence of heat treating (‘pot lids’ or red/burned coloration)?
Function: Is your point a spear/dart point or an arrow point? Could it be possibly used as a knife? Has this tool been re-sharpened? What’s your evidence behind your assertions? Hint: use the hand lenses and microscope in the Lithics Lab to look for edge damage (flake scars, polish, striations (lines/scratches), anything that might be a clue as to how the tool may have been used.
Shape: Is your point a fragment? Is it missing any part of its anatomy (i.e., its distal end)? Also describe the point overall shape, attributes of its base, notching, etc.
Type: Can you find a close match in our type books/posters? If so what is it, when might it date to and where might it be found? Could it match more than one type?
Manufacture: Does your point have any unusual manufacturing characteristics? Was its base ground? Is there any cortex still on your point? If so where? Does it have parallel pressure flaking, etc.
Qualitative: What is you overall impression of the point? Was it well manufactured? Create a sketch of your point. Start with a basic outline (you can attempt to trace the point) and include major flake scars, cortex, etc. Look at examples of illustrations in materials lying around the Archaeology Lab to get ideas about line weights, shading, stippling, etc. . . . I don't expect you to be a great artifact illustrator but a little experience can't hurt.
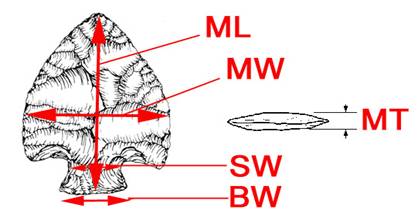
Quantitative: Using the calipers, list the basic metric attributes of your point. Be sure and include the following (if applicable to your point): Maximum Length (ML), Maximum Width (MW), Basal Width (BW), Maximum Thickness (MT) and Stem Width (W) (see figure below).
Turn in your ‘report’ on each of your four projectile points (Exercise 3a) by the end of class on Thursday 28 January, 2010.
~ ~ ~ ~ ~ ~ ~ ~ ~ ~ ~ ~ ~ ~ ~ ~ ~ ~ ~ ~ ~ ~ ~ ~ ~ ~ ~ ~ ~ ~ ~ ~ ~ ~ ~ ~ ~ ~ ~ ~ ~ ~ ~ ~ ~ ~ ~ ~ ~ ~ ~ ~ ~ ~
26 & 28 January, 2009
Exercise 3b
1). Open Virtual Dig by clicking on the Virtual Dig icon on the desktop. Once the program is open then go to the Lithics Lab section. There are four sections here in the Lithics Lab: Flintkanpping Primer, Lithics Measurments, Stone Tool Attributes and Lithic Typology. Start by clicking on Flintknapping Primer.
2). Read carefully about flintkanpping, soft hammer percussion, pressure flaking and eccentrics. Then go to the flake simulator by clicking on its tab at the top of the window.
Follow the instructions on this page and virtually remove at least three blades (flakes with parallel edges that are at least twice as long as they are wide). Try to make your blades as thin as you can as there will be less flaking to do later to achieve a good, workable (virtual) stone tool. To do this just strike your blow close to the red dot on the Core Platform Surface. You’ll want to experiment with where you place the dot before you ‘strike’ the core to remove the blade. This will be a good way to simulate what a flintknapper does when they experiment with the placement and force of their blows.
3). Once you have three good blades, which will serve as blanks for the creation of flaked stone tools, get to work knapping (NOT napping!) by following the instructions and pointers you’re given. Once you’re sort of happy with what you have created save your image by giving it a name. It will automatically be saved as a bitmap (bmp) image.
4). Next, close this section of the Lithics Lab and go to the Lithics Measurements section. Read the How to? Section and look at all three examples. Then go to Practice Measuring by clicking on the tab at the top of the window.
5). Complete the measurements on any three of the ten lithic tools. Go to File and click on Copy graph/image/spreadsheet. Minimize your window on Virtual Dig and open Excel on the Desktop. Paste your spreadsheet of lithic measurements into Excel and then print your spreadsheet and write your name in the top right corner.
6). Go to the third section under Lithics Lab entitled Stone Tool Attributes. Read “A Word About” then click on the Cortex tab. Complete all of the exercises under this section for on any five of the ten lithic tools. Check your results under Practice Results. Any red numbers there? If so, correct these. Go to File and click on Copy graph/image/spreadsheet. Minimize your window on Virtual Dig and open Excel on the Desktop – it should be the icon right next to the Virtual Dig icon. Paste your spreadsheet of stone tool attributes into Excel and then print your spreadsheet.
You’ll hand in these two printed spreadsheets of Exercise 3b. They are due by the end of class on Thursday 28 January, 2009.