Using the Ada Server
Uploading and viewing files
- You must be logged in to the UNCW domain to access Ada and its URLs. If you are off campus, you need a VPN connection. See uncw.edu/ITSD/help/VPN.htm for details.
- You need to have an FTP client (WinSCP is in the labs, Filezilla Client is preferred if you're downloading for either Mac or Windows) to do the following steps.
- If you're off campus, start a VPN connection if you haven't done so already.
- Open your FTP client (WinSCP is in the campus labs)
- Login using host name ada.cis.uncw.edu, your UNCW username, password and Port 22.
- If there is a security question about the host key being unknown, answer Yes and add the key to the cache.
- The left half of the screen is your local computer and drives, the right half is your personal web server space.
- If there isn’t a folder called public_html on the right side, right click and create a new directory called public_html and set the permissions or properties to 755 and check the box "recurse into subdirectories" (if necessary.)
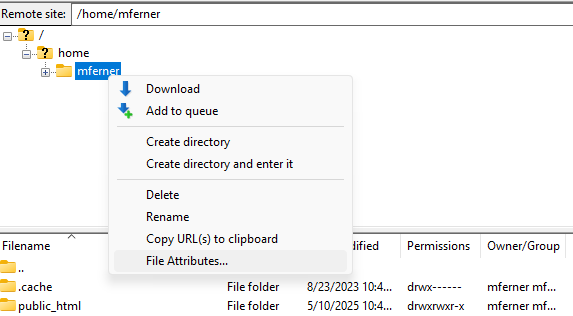
- Navigate to the folder corresponding to your username in the right pane.
- Right-click on your folder, and select File Attributes or File Permissions
- Set it to 711 if necessary
- Edit your web files as usual, saving to OneDrive or your preferred location. If you are using Horizon, you must save your files to OneDrive.
- When you are ready to test, locate the local web files and folders in the left pane. Drag and drop them into your public_html folder in the right pane.
- Test by opening a browser and entering your personal URL followed by the name of the file you are testing (including the extension):
http://ada.cis.uncw.edu/~abc1234/filename.xxx (substituting your userid).
If a message pops up about a potential security risk, click the Advanced button, and accept the risk. (This happens because Ada uses a self-signed certificate.)
If the file is in a folder, you must include the folder name before the filename:
http://ada.cis.uncw.edu/~abc1234/folder/somepage.xxx
- To make corrections, edit in the application as you usually do (don’t edit straight from the server.) Then save the file, re-upload it to the server, and then refresh the browser.
- As you make changes, don't continually upload the entire website. Just upload the file(s) that were changed.
Problems?
- Check permissions on your home directory on Ada:
- Using your FTP client, and while logged in, navigate to the folder corresponding to your username in the right pane.
- Right-click on your folder, and select File Attributes or File Permissions
- Set it to 711 if necessary
- Check permissions on your files and folders inside public_html. File permissions should be 644, and folder permissons should be 755
- Make sure the URL is correct with the tilde character, your username, and any folder names you uploaded.
- Make sure the files you uploaded are inside the public_html folder.